menu
close_24px

Image Segmentation

APPLICATIONS

Image segmentation

Overview

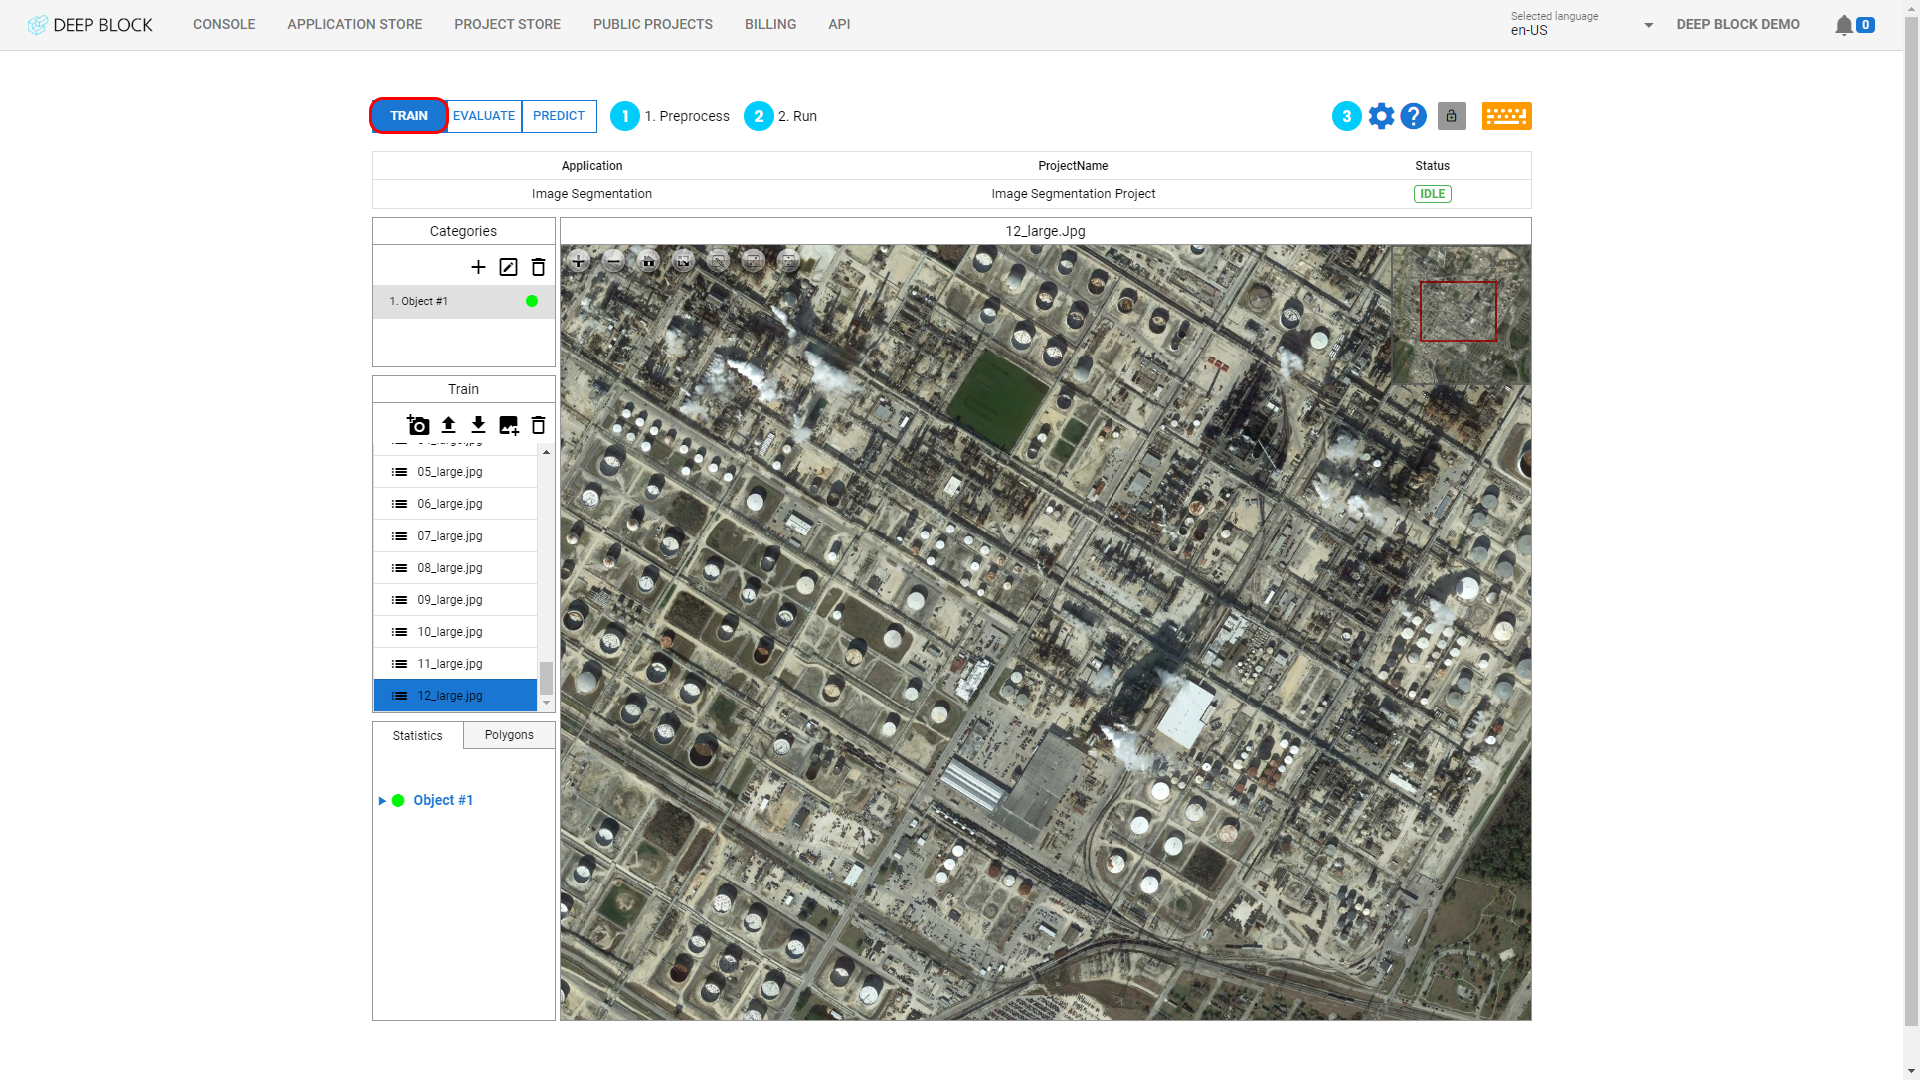
What is image segmentation?

Deep Block Help Center_Mastering the data labeling tool #2

Image segmentation is the process of partitioning an image into multiple segments, or regions, each of which corresponds to a different object or part of the scene. The goal of image segmentation is to simplify and/or change the representation of an image into something that is more meaningful and easier to analyze.

With Deep Block, you can isolate the image's constituent parts under their respective categories or class labels. This way you can automate your computer vision tasks for:

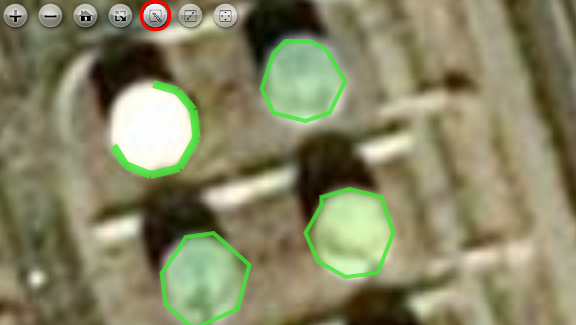
  1. Object recognition: By segmenting an image into its constituent objects, it becomes easier to recognize and identify each object individually.

  2. Morphology: Image segmentation can be used to extract information about the objects or regions in an image, such as size, shape, color, and texture.

  3. Image classification: The area extracted through segmentation can be a separate image and used as input for an image classification task.
    Through this, instances(polygons) can be classified more precisely and analyzed in more detail.

  4. Background subtraction: Image segmentation can be used to separate the foreground objects from the background in an image.

  5. Measurement: Segmentation can also be used for measuring the area and length of objects and other measurement tasks.
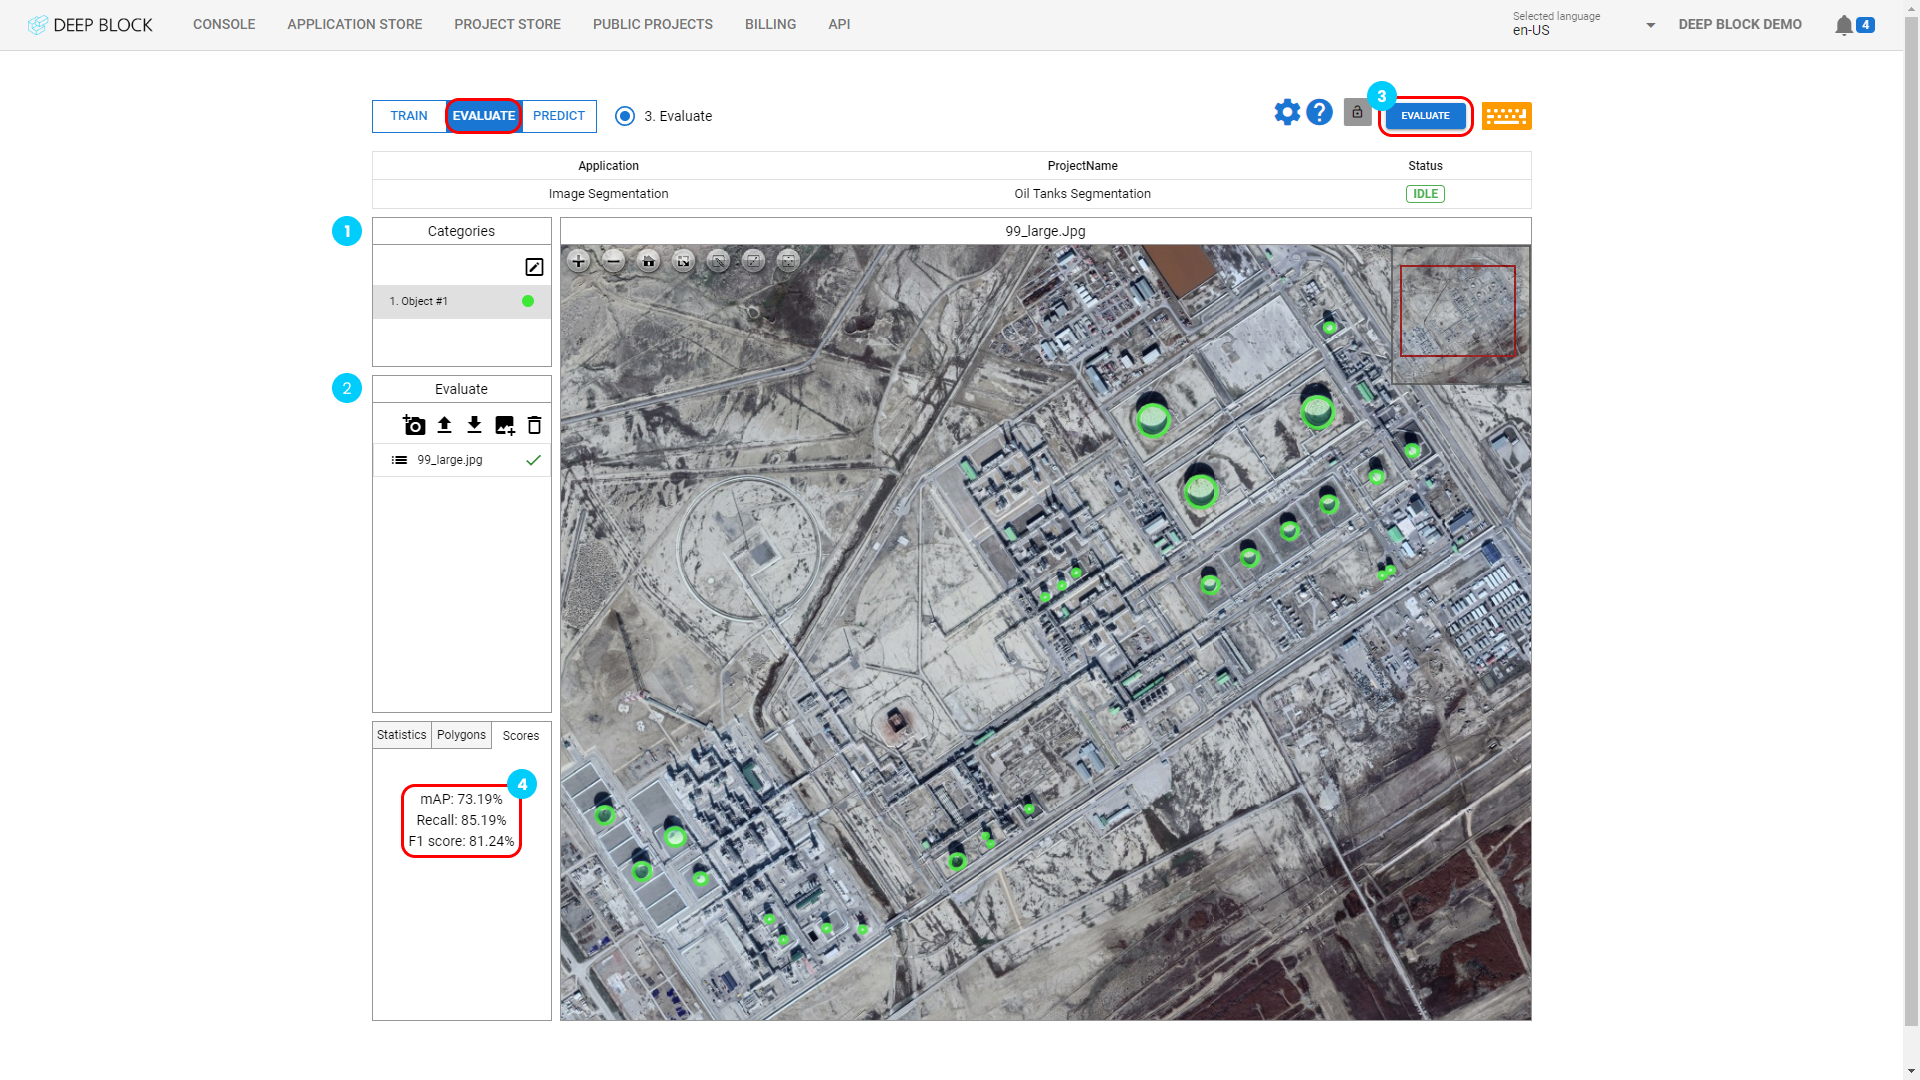
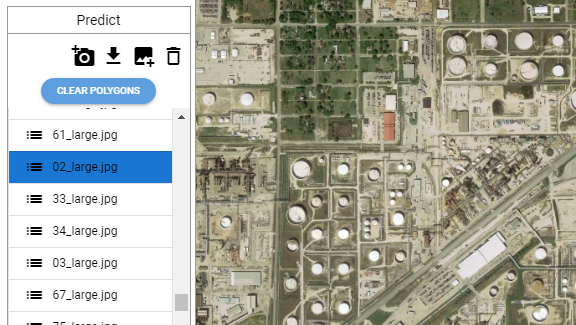
Get Started

  • Go to the Console.
  • Click on "CREATE" to display the New Project pop-up window.
  • Click on "COMPUTER VISION".
  • Click on "IMAGE SEGMENTATION".
  • Enter a project name in the dedicated field.
  • Click on "CREATE".

Deep Block Help Center_Create your first project #2

Workflow

The workflow to train your image segmentation model is divided into 3 stages:

  1. Train: The training stage is the most crucial stage of the AI modeling pipeline. It is divided into 2 modules:

    • Preprocess: Before running the training process, the data must be carefully selected and annotated with semantic information such as object labels and polygons.

    • Run: Running the model training will push the data batch into multiple training cycles until the model has had enough opportunities to learn the patterns in the data.

  2. Evaluate: Evaluate the performance of the trained model on new, unseen data and make any necessary adjustments to improve its accuracy and performance.

  3. Predict: Apply your newly trained model to make predictions based on the patterns learned from the training data.

Train

  • Click "TRAIN" at the top-left corner of the Project view to display the "1. Preprocess" module.
Deep Block Help Center_Image Segmentation #1-2
1 - Preprocess

The "1. Preprocess" module is displayed by default when clicking on the "TRAIN" stage.

  • If not, click on "1. Preprocess".

To get started with your image segmentation model training, you must first gather the raw data that will be annotated. This includes images from multiple sources that are related to the use case you are trying to solve.

Once the data is ready to be annotated, refer to the Master the labeling tool to learn how to import images or datasets, and label images. 

To understand training data preparation, please read following articles.
- Trial and Error
- Importance of Early Stopping & Appropriate Epoch

Deep Block Help Center_Create your first project #5
2 - Run

Now that your data is annotated, you can run the training module.

  • Always in the "TRAIN" stage of the workflow, click on the "2. Run" module to toggle the Inference Model panel.
  • Enter the adequate value in the Epochs field (see below).
  • Click 'TRAIN" on the top-right corner of the interface.
  • During this process, a few Processing and Loading pop-up windows will appear, you can click away to make them disappear. 
  • A graph illustrating the progress of the Training Score will appear and evolve with each cycle. Wait until the end of all your training cycles. 
Deep Block Help Center_Image Segmentation #2

How to select the right value for Epochs?

An epoch is a single iteration through the entire training dataset in machine learning. During each epoch, the model is trained on a batch of training data and the parameters of the model are updated based on the results. The goal of each epoch is to improve the model's performance on the training data. Typically, multiple epochs are run during the training process to ensure that the model has seen the entire training dataset multiple times and has had enough opportunities to learn the patterns in the data.

More epochs are usually better for training a deep learning model, as this allows the model to see more training examples and to continue refining its weights and biases.

However, there is a trade-off between the number of epochs and overfitting. If the model is trained for too many epochs, it may start to memorize the training data and become less capable of generalizing to new, unseen data.

We recommend using 20 as the general value for the Epochs field. However, this value may vary depending on multiple factors.

For more information, visit here.

How do I know if my model is learning properly?

Read this article.

3 - Configuration

The "Configuration" panel contains different options to change the image processing settings.

  • Tiling

Tiling represents a sophisticated technique in image processing that involves partitioning expansive images into smaller, overlapping sections, or tiles. This strategic division serves as a powerful solution for tackling the challenges posed by ultra-high-resolution images, facilitating streamlined processing and in-depth analysis.

With tiling, the Deep Block platform enhances its capability to effectively manage and analyze intricate images. This approach is particularly advantageous when engaging in tasks like object detection or image segmentation. The method involves dividing the larger image into a grid of rows and columns, effectively creating a mosaic of interconnected tiles.

After choosing the adequate number of rows and columns, click on "DIVIDE" to start the tiling process. The status will change to "DIVIDE" until the process is over.

To optimize the tiling process, it's recommended to maintain a balanced size for each tile, aiming for dimensions of approximately 1000 pixels by 1000 pixels. This guideline ensures that each tile encapsulates a substantial amount of information while remaining manageable for processing. For instance, an image of dimensions 8k x 8k pixels can be segmented into an 8 x 8 grid, providing a cohesive framework for comprehensive analysis.

스크린샷 2024-04-12 204600

Evaluate

  • Click on the "EVALUATE" stage at the top-left corner of the Project view to display the "3. Evaluate" module.
Deep Block Help Center_Image Segmentation #4-2
1 - Check the categories

The "3. Evaluate" module resembles the "1. Preprocess" module.

The Categories panel is displaying the same categories or class labels as the "1. Preprocess" module. To learn more about categories, refer to Mastering the labeling tool.

2 - Import and label your evaluation dataset

The Evaluate panel resembles the Train panel in the "1. Preprocess" Module and follows the same functionning. That is where you can import your images or data sets for the evaluation stage.

The evaluation dataset should be different from the training dataset so that your model capabilities can be tested on new, unseen data.

To learn more about how to import images and data sets, refer to Mastering the labeling tool.

Once your data is imported, you must annotate it, if it is not already, just like in the training phase. This way, the evaluate module will be able to compare your annotations with the model predictions and establish a score.

If you want to import annotation data that you already have, please check this

Deep Block Help Center_Image Segmentation #5
3 - Evaluate

Once your evaluation data set is labeled and ready, you can now launch the evaluation module. 

  • Click on "Evaluate" at the top-right corner of the Project view.
  • Your dataset will be processed, please wait until the evaluation is over and the processing status returns to "IDLE".
4 - Performance Scores

After evaluation, performance scores are now available.

  • Click on the "Score" tab in the bottom-left panel of the Project view.

Your model performance score is composed of important 3 metrics:

  • mAP: mAP, or mean Average Precision, is a metric for measuring the average accuracy of your model. The average precision of a model is defined as the average of its precision scores for different recall values. Precision is defined as the number of true positive detections divided by the total number of detections. A high precision score means that the model is producing few false positive detections. By extension, if your mAP score is high, it means that the model is producing few false positive detections at multiple recall values. 

  • Recall: Recall is defined as the number of true positive detections divided by the total number of ground-truth objects in the image. A high recall score means that the model is detecting a large proportion of the ground-truth objects in the image.

  • F1 Score: used to evaluate the overall performance of the model in terms of its ability to correctly identify and segment objects in images. The F1 score provides a single number by balancing precision and recall.

Predict

  • Click on the "PREDICT" stage at the top-left corner of the Project view to display the "4. Predict" module.
Deep Block Help Center_Image Segmentation #6-2
1 - Threshold value

The threshold value is used to distinguish between different classes or categories in an image. It is used to separate foreground (object of interest) from background pixels. The threshold value is used to determine the value of each pixel in the image, and pixels with a value greater than the threshold are assigned to the foreground class, while pixels with a value less than the threshold are assigned to the background class.

  • Enter the appropriate value in the Threshold score (%) field.

The choice of threshold value in image segmentation is an important step in the image segmentation process, as it can significantly impact the quality of the segmentation results. A good threshold value should be chosen such that it accurately separates the object of interest from the background, and does not introduce false positive or false negative pixels. The choice of the threshold value is often determined through experimentation but we suggest beginning with a lower threshold score and gradually increasing it until you achieve a result that meets your satisfaction.

2 - Prediction Dataset
Now that your model is trained and evaluated, it is time to put it to the test with a large-scale project. Upload your images to try out your brand-new model.

  • Click on " Deep Block_Icon_Webcam " to add an image via your webcam.
  • Click on " Deep Block_Icon_Download " to download the inference result as JSON file. (COCOJSON style or GEOJSON)
  • Click on " Deep Block_Icon_Image Upload " to import images that you wish to use.
  • Click on " Deep Block_Icon_Remove " to remove an image after selecting it.
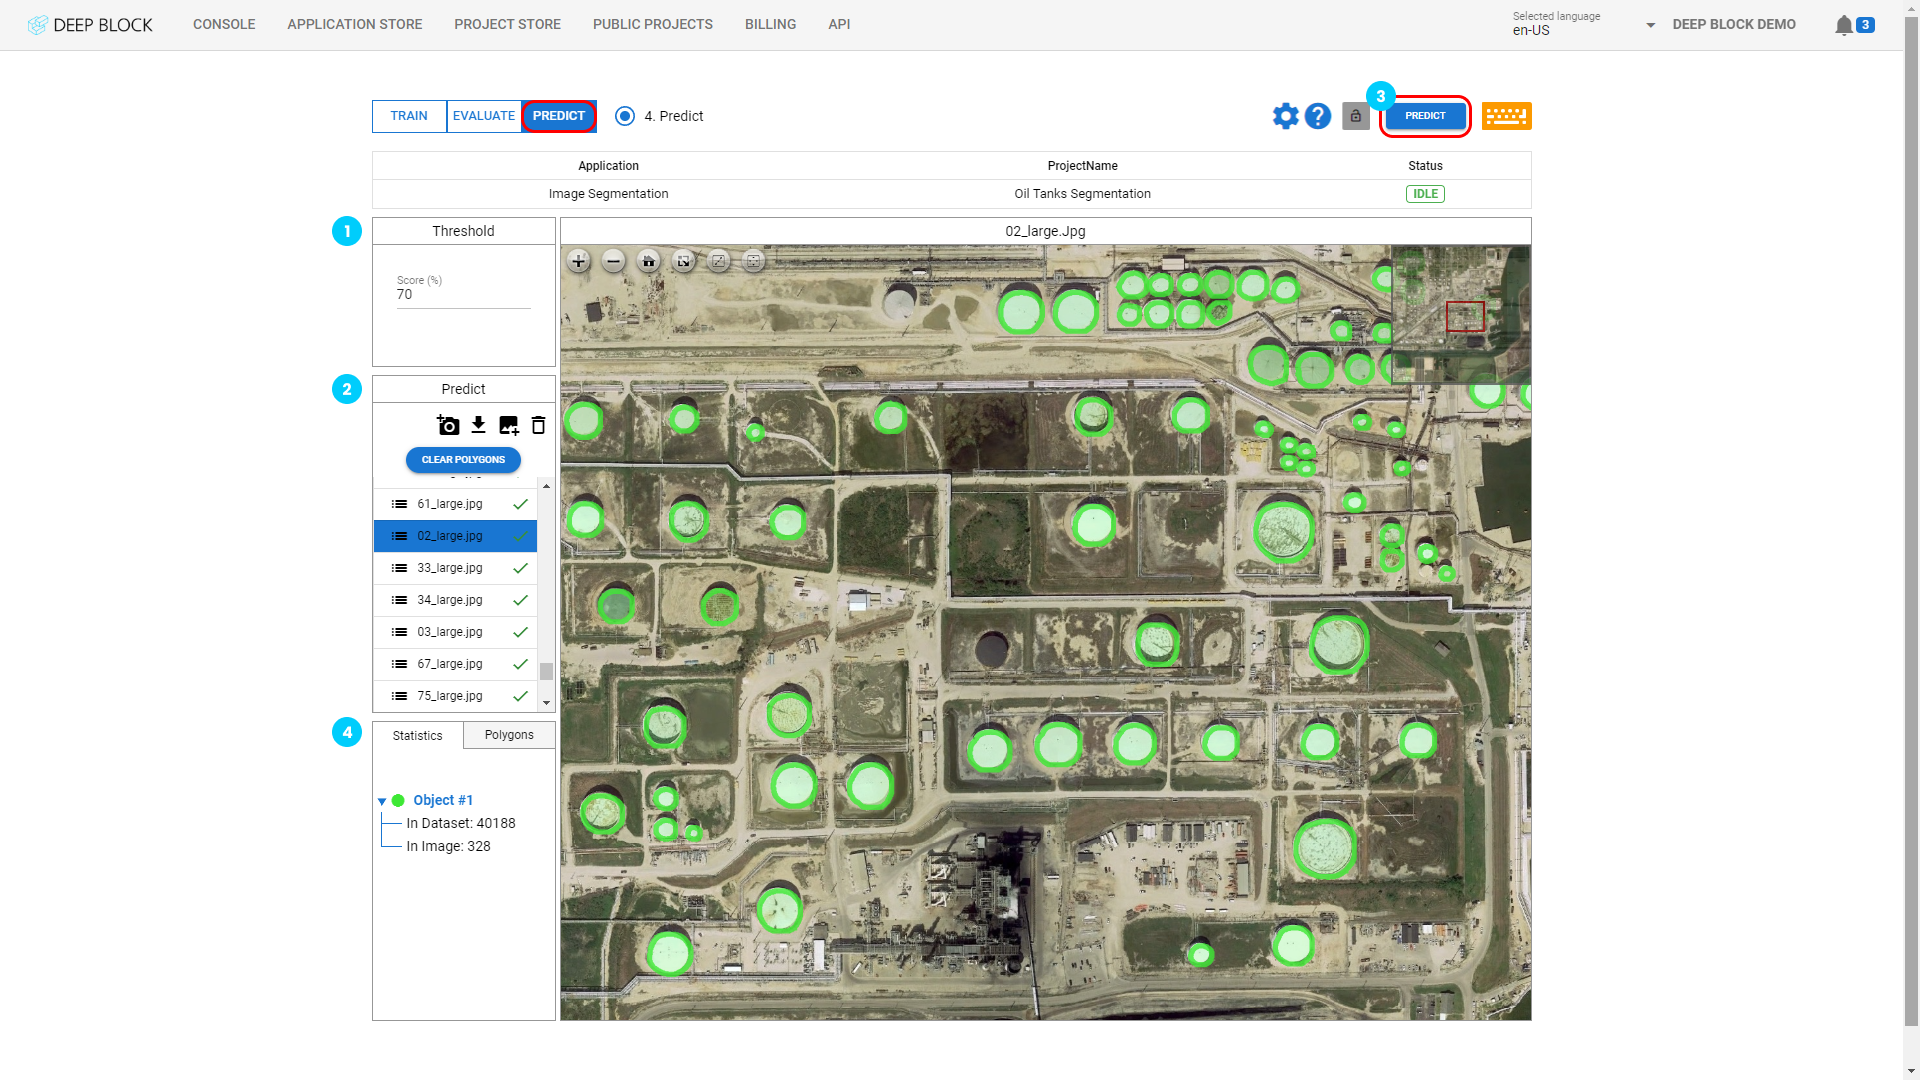
  • If a prediction has already been made, click on "CLEAR POLYGONS" to remove all polygons.

Image file formats supported are: png, webp jpg, geotiff, tiff, bmp, and jp2 (10GB max file size). If you want to upload a bigger file, contact us.

Deep Block Help Center_Image Segmentation #7
3 - Detect

Once your dataset is uploaded, you are ready to launch the prediction.

  • Click on "PREDICT" at the top-right corner of the Project view.
  • The processing will start. Depending on the number of images uploaded, this process could take several minutes. You can stop it at any time by clicking on "STOP".

Wait until the processing status returns to "IDLE". By then, the model would have created polygons around the desired objects of interest.


Deep Block Help Center_Object Detection#11
4 - Statistics

The Statistics tab indicates, per category, the number of polygons within the project dataset or in the selected image.